Blogs by Category

Showing posts with label recipe. Show all posts

Tuesday, August 26, 2014

Brassicas by Laura B. Russell

brassicas-book-page

This is from the author's website: 

Acclaimed by doctors and nutritionists for their miraculous health benefits, brassicas such as kale, Brussels sprouts, cauliflower, broccoli, and cabbage can also be the most delicious part of your meal when properly prepared. The 80 inventive recipes in Brassicas play to each vegetable’s strengths, favoring techniques that celebrate their intrinsic flavors instead of masking them under layers of cheese or boiling them to death. Think of the inherent sweetness that can be coaxed from perfectly roasted Brussels sprouts, or the bright, peppery punch of a watercress and arugula salad.

You can find more info from the author by clicking here. 

I think this is going to be one of my FAVORITE cookbooks. Wow - I am impressed. First, I eat lots of Kale -- I have it growing in my garden right now. Kale is just one of my favorites. I also eat lots of brussels sprouts, broccoli and cabbage - I actually eat a variety of these daily. To find new recipes and ways to serve them is soooooo exciting. I can't wait to try the Kale and Sweet Potato Saute. It sounds yummy. Her recipes look easy to make and yet very healthy. The Tropical Radish Rice Salad also sounds delicious. Each chapter covers one of the types of Brassicas. The introduction to each chapter tells about that brassicas, how to select and prepare them, plus their nutritional value. 

The recipes and the information look fantastic. This one is a real winner!

I almost forgot this --- and to our family it is probably THE most IMPORTANT aspect of what makes this book great --- p. 158-160 is a special diets table where at a glance you can view the recipes and determine what will work for your dietary needs and what won't. In our family we have one person that can't have dairy, two of us can't have gluten and one of us can't have soy. Yes, we are a JOY to cook for. (sarcasm dripping!) This table makes it so easy - at a quick glance I can easily determine what would be okay and what is out for us. Love it! Wish all cookbooks were as thoughtful to the consumer!

I received this book from Blogging for Books for free in exchange for a honest review.

Saturday, August 2, 2014

Chicken or Chickpea Salad - no gluten, no soy, no dairy


I found this on foodbabe.com. It is suppose to be served as a sandwich in a wheat tortilla. It does say for gluten-free to use a brown rice tortilla. I have been gluten free and I guess I could have gotten the brown rice tortillas. My husband enjoys them. I just don't gravitate toward tortillas --- and I love salads. So I made the recipe but put it on a bed of mixed greens. I had some fresh garden tomatoes that I put on the side. It was delicious. Really loved it. And no soy, no gluten, no dairy. It does call for 1/4 cup organic yogurt -- and it does say you could use almond or coconut plain yogurt. I used the coconut yogurt but it was vanilla. I sent my husband for the plain and they didn't have it --- and vanilla is close. It was actually very good. Really loved it. Here is the link to the recipe. Click here. 

I was impressed with how quick and easy it was to make -- and how delicious it tasted. 

Sunday, May 25, 2014

Very Berry Detox (smoothie)

I found this recipe in Deliciously G-Free by Elisabeth Hasselbeck. She has lots of really good recipes in her book. If you are going gluten free --- I recommend this book. She calls this a detox but it really is a delicious smoothie. It was very refreshing on a warm day.

1/2 cup blueberries
1/2 cup raspberries
1/2 cup blackberries

(I didn't have raspberries or blackberries --- I had blueberries and strawberries that we had picked ourselves and then frozen. Frozen worked really well. Added a bit of cold to the mix - really delicious!)

1/2 cup baby spinach leaves
1 cup brewed red bush or green tea (we used organic decaf green tea)
1 tablespoon sugar (we did not add this - berries are sweet enough)
4 ice cubes

Place all the ingredients in a blender and blend on high speed until smooth. Serve immediately.

Thursday, August 22, 2013

Excellent Fresh Tomato soup


We really enjoyed this Tomato soup with tomatoes fresh out of our garden. It was delicious. I did 'edit' it some. I made it completely organic and gluten free. I used olive oil instead of butter - and then added potato flour for the thickening agent. I did not add salt or sugar (who needs that - the tomatoes add enough of their own flavor). I did separate the soup into two pans - and added milk to most of it - as the rest of the family likes it creamy - and I loved it just as is. So no milk for me. Further, I just used a blender and blended all the ingredients - so they all stayed in the soup - no reason to 'lose' any of the good value of all those veggies. Since I planned to blended it I did not put the garlic in whole but chopped it up. Once blended it was fairly smooth. Click here for the recipe.  It was very, very good. 

Saturday, July 27, 2013

Gluten Free, dairy free, soy free banana bread

Can you believe it! Gluten free, dairy free, soy free banana bread - and it tastes really good!

My Mother-in-law had a recipe for banana bread --- I totally edited and it turned out! So here is my version---the gluten free, dairy free, soy free version (now doesn't that just make you wonder what is in it!)

Cream together in one bowl
1/3 cup coconut oil
1 cup sugar (I used less - about 3/4 cup)
2 eggs
3 tablespoons rice milk - plus 1 teaspoon of vinegar - let sit for 1 minute then add into mixture

Use two bowls - in one bowl mash the bananas - in the other mix all the other ingredients listed below
1 teaspoon baking soda
1 teaspoon baking powder
1 teaspoon cinnamon
2 cups Pamela's artisan flour blend (an alternative to wheat - gluten free)
2-3 mashed bananas (I only used one and it was a bit dry - two or three would have been better)

Alternately add the flour mixture and bananas to the first bowl (of coconut oil, sugar, eggs & rice milk).
Mix well. 
Grease a bread pan with coconut oil. 
Bake for 1 hour at 350 degrees. 

It tasted really great - it was a bit on the dry side --- so next time I will make sure to use two or three bananas and/or add a bit more coconut oil. Tasted awesome though. We loved it. 


Saturday, June 29, 2013

berry picking & recipe

We went berry picking today - yum! Don't they look delicious!
I cut them up and put them in freezer bags - the kids love to use them in smoothies.


This was a drink recipe that I found in the July 2013 issue of Better Homes and Gardens. But of course we modified it --- into more of a smoothie. You can see it is more than half gone before I even got to snapping a picture --- it was very, very good and refreshing on a hot day.

Strawberry Coconut Cream Soda
3 cups fresh strawberries - cut up
2/3 cup sugar (we didn't use this at all - and it was wonderfully good without it - berries have their own sweetness)
3/4 cup refrigerated coconut milk
3 to 4 cups club soda or carbonated water, chilled (we used carbonated water - the blue cans of Lacroix - and we used 1 soda can)

In a medium bowl combine strawberries and sugar. Stir well to combine. Using a pastry blender, coarsely mash the strawberries. (Okay - we didn't do this - we don't like large pieces in our drinks --- so we put all the ingredients except the carbonated water in a blender - and blended - once blended we added the carbonated water. And it was done - quick easy and very, very delicious!)

If you do the other way - here are the rest of the directions - Place 1/3 cup of the mashed strawberries in each of six glasses. To each glass add ice, 2 Tbsp coconut milk and 1/2 to 2/3 cup club soda or carbonated water. Stir drinks just before serving.

Again - we blended and it was fabulously delicious. We also did not add any sugar. Healthier that way - and still yummy.

Friday, March 2, 2012

sprouting

I have been getting into sprouting as it is so healthy for you and a great way to get fresh 'greens' in the middle of winter. This was one that I was just fascinated to try. This is the Beanie's Awesome Mix - after sprouted and ready to be eaten. I tried them just eating them by themselves - very good; put them on a salad - really loved them that way; and tried this recipe -- click here --- with a few modifications (no soy sauce) - it was fabulous. My husband and I enjoyed it very much - my kids took one look and wanted nothing to do with it. Sprouts are just not for them - which I really don't understand - because I just loved them.

I took a bunch of pictures of the various sprouts I decided to get -- who knew there were so many types of sprouts - until I got into this - I have only eaten alfalfa sprouts. Love them but the variety of sprouts is just fascinating.
I have this one - the French Garden - in my sprouter now. It needs a few more days before it will be ready to munch on. It looks really good though.


I purchased the sprouter from here - and it came with the package of alfalfa sprouts. The rest of the sprouts came from here. Lots of recipes on the sprouting website also. I was just amazed to see the variety of sprouts and to see all the different ways sprouts can be used. Another interesting fact - most sprouts have a fairly long shelf life - you can find out more about that by clicking here.

Happy sprouting!

Thursday, January 19, 2012

juicing - going GREEN

One of the healthy things that has been suggested to me is to work at raising my PH level. I got the test strips and my level was at the bottom of the acceptable range - which isn't horrible but I want to make sure it is well into that range. Green veggies help to make the body more alkaline. So it was recommended I do Green Smoothies with green supplements added in. Here it is in the blender.
Below is the concoction as it is starting to get blended.
This is the final product. It looks just awful doesn't it!! Well, surprise, surprise - I actually like it. My family thinks I am nuts but it really does taste much better than it looks.
If you are interested in giving this a try - here is the recipe from a friend's website: click here
I made the Basic Green Smoothie. I did not add any honey and I only added one apple - as I am not doing that much 'sweet' stuff. I cut out all soy and all sugar for now - until I get my body more stabilized - sugar will come back in moderation later. Actually I am hoping to add in more fruits soon. Anyway, since I have been off all sugar for 2 months now, adding just one apple made it seem incredibly sweet to me. I used just a little bit of kale and then I used collard leaves. The green powder came from here. Enjoy - it really is quite taste - ya just have to get past the look of it.

Friday, September 16, 2011

Dinner


We had just a fabulous dinner tonight. It was a rather unusual combination but really tasted well together. We had asparagus & green beans (for those in the family that just won't eat asparagus), corn beef (baked in the oven - it was so nice to turn the oven on to take the chill out of the air), Smoky Three-Bean Bake and Hot Potato Salad. The bean bake and the tater salad were new recipes - and WOW were they good. Highly recommend both. Here they are:

This is the link for the recipe for the Hot Potato Salad (really good!).

This is the link for the Smoky Three Bean Bake (also really good!).

I wanted to make a nice dinner for the family as it was the first time in several weeks that we were able to sit down all of us together. It seemed like we should have a special dinner. Normally, we always try to have family dinners - sitting down, praying, eating and sharing what happened in our day. Since my oldest is now going to school - things have changed, schedules have changed and we don't always get to have family dinners together. I miss that.

Sunday, July 10, 2011

Roasted Cumin & Chickpea Salad

3/4 tsp ground cumin
2 Tbsp olive oil
2 Tbsp fresh lime juice
Salt and Pepper
1 15-oz can chickpeas, rinsed
1 stalk celery, thinly sliced
1 medium tomato, chopped
1/2 small red onion, finely chopped
1 oz feta, crumbled (about 1/4 cup)

1. Heat a small skillet over medium heat. Add the cumin and cook, stirring until toasted and fragrant, about 1 minute. Transfer to a large bowl.

2. Add the oil, lime juice, 1/2 tsp. salt and 1/4 tsp pepper to the bowl and whisk to combine.

3. Add the chickpeas, celery, tomato and onion. Toss to combine. Let sit, tossing occasionally for 15 minutes.

4. Fold in the feta before serving.

I found this recipe in a Woman's Day magazine - and was pleasantly surprised by how good it tasted. I am always looking for new and interesting things to make for the family. Salads are so nice during the summer. No turning on the oven! A huge plus when it has been rather hot here lately.

Sunday, July 3, 2011

Spicy Skillet Chicken


Spicy Skillet Chicken by Betty Crocker --- I tried this for the first time and my husband absolutely loved it. Thought it was one of the best recipes I have made in a long time. Even I loved it - as it was flavorful but not really spicy.

Here is a link to the recipe: link to recipe
It is really quick and easy to make. And very, very good.

Saturday, July 2, 2011

Fresh Corn Salad


This was really delicious. A great salad to make for the summer. Light, fresh. Does have a bit of a zip to it. Be warned though - it makes quite a lot. I am showing a small portion here in the picture - that I packed up for my parents to take home.

8 ears of corn, shucked
6 fresh tomatoes, chopped (I used Roma tomatoes)
2 cucumbers (The recipe said to peel, seed and chop - I didn't do that. I used only one cucumber but I used the whole thing. I did not peel or seed the cucumber.)
2 green onions, chopped
1 green sweet pepper, seeded and chopped. (I also added a red, yellow and orange sweet pepper - seeded and chopped)
1 jalapeno - seeded and chopped. (I don't like things too spicy so I only used 1/2 of the jalapeno.)
1/4 cup chopped fresh cilantro
4 Tbsp. white balsamic vinegar
3 Tbsp. extra virgin olive oil

1. Preheat grill to medium-high. Brush corn with a little olive oil. Grill corn until lightly browned, turning to cook evenly. Cool. When cool enough to handle, cut corn from cobs.

2. Toss corn with tomatoes, cucumbers, green onions, pepper, jalapeno, cilantro, vinegar and the 3 tablespoons of olive oil. Season with salt and pepper. Toss and marinate at least 2 hours in the refrigerator before serving.

Sunday, March 20, 2011

new recipe

I tried a great new recipe for chicken ---- and I took a great picture of it. I can 'see' the picture on my camera but can't download it to my computer. My husband is working on fixing the problem. I decided to blog on - and just go with clip art.

Turkey_oven_big

Don't you love my chicken! Yep I cooked her up!

Anyway, the whole family loved this even my picky eaters!

Take French's Original French Fried Onions - about 2 cups. Crush with a rolling pin (or a glass will work).
Take boneless chicken breasts and dip them into an egg.
Then coat with onion crumbs, pressing them to the chicken if they don't stick well.
Place chicken on a baking sheet and bake at 400 for 50 minutes. (Or however long it takes for the chicken to no longer be pink in the center.) I had really large chicken breasts and they were still partially frozen - so they took about 50 minutes. If they are smaller and completely thawed I would think 30 minutes would do the trick.

The chicken tasted delicious. I actually have to confess that I heard this on TV on a commercial for French's Fried Onions. I hate to even admit that the commercials 'sell' anything. I truly try to blot most commercials out. For some reason, I was listening and this commercial caught my eye. I actually sent my husband to the store to buy French's Fried Onions today just to make this. Sadly, the commercial did the trick. It was good though.

Monday, January 17, 2011

making bread

Funny little tidbit - I have struggled to make bread for years. Couldn't do it! I killed the yeast every time. I have only been successful making bread in the breadmaker. Yet, honestly for all the homemade foods that I make bread just shouldn't be that hard for me. A very good friend of mine gave me a recipe she uses and some helpful hints on the phone. And glory be but it worked. I have since made several batches of bread! It is amazing. My youngest wanted to help out with today's batch. The kids think it is absolutely great that we now have fresh homemade bread - and what a great smell when cooking! Love it.


The loaves didn't turn out perfectly shaped but that is cause I had help - and it was more important to let the 7 year old help then to worry about it being perfect. Plus, we only care that the bread rises - not that the loaf is shaped perfectly. Rising is a big deal --- because when you kill the yeast like I am known to do --- ya get a lump of dough and it just sits there. Starring at you! Almost laughing in your face! Yuk!

Here is the recipe - in case any of you want to try it. I find it is much better tasting than store bought bread and far cheaper.

6 to 7 cups of wheat flour - I use 3 1/2 cups of whole wheat and 3 cups of a lighter, white wheat.
3 tablespoons sugar
1 tablespoon salt (I use sea salt)
2 tablespoon shortening
4 1/2 teaspoons regular or quick action dry yeast
2 1/4 cups very warm water (microwave water for 2 minutes - then use)
2 tablespoons butter, melted
1/4 cup of honey

  • In a large bowl, stir 3 1/2 cups of the flour, sugar, salt, shortening and yeast until well mixed.
  • Add the warm water. Beat with an electric mixer on low speed 1 minute, scraping the bowl frequently.
  • Add honey and beat/mix with electric mixer
  • Stir in enough remaining flour - 1 cup at a time to make dough easy to handle - I add 3 cups
  • Place dough on a lightly floured surface and knead about 10 minutes.
  • Grease large bowl with shortening. Place dough in bowl, turning dough to grease all sides. Cover bowl loosely with plastic wrap and let rise in a warm place about 60 minutes. (I plan it that when I am making bread I have something else going in the oven - then I put the bread to rise on top - it is warm there and rises nicely) Let it rise until the dough has doubled in size. Dough is ready if indentation remains when touched.
  • Grease bottoms and sides of two 8x5 or 9x5 inch loaf pans
  • Gently push fist into dough to deflate it. Divide into two.
  • Flatten each half with rolling pin into roughly 18x9 inch rectangle on a lightly floured surface. Roll dough up tightly beginning at 9-inch side. Press thumbs to seal after each turn. Pinch edge of dough into roll to seal. Pinch each end of roll to seal. Fold ends under loaf. Place seam side down in pan.
  • Brush loaves with butter.
  • Cover loosely with plastic wrap and let rise on stove top another 50 to 60 minutes (or until dough has doubled in size)
  • Move oven rack to low position so that tops of pans will be center of the oven. Oven should be preheated to 425 degrees.
  • Bake for 25 to 30 minutes or until loaves are deep golden brown and sound hollow when tapped.
  • Remove from pans to wire rack to cool.
Very, very tasty! I have found that cutting the bread with an electric knife works incredibly well.

I tried a variation - and added 1/2 cup of Bob's Red Mill Oat Bran Hot Cereal (basically it is adding fiber to the bread) - and cut the wheat amount by 1/2 cup. My oldest son loves it even better than the regular recipe. The bread was softer and he likes that. Plus it has a slightly different but very good taste (according to my son). So give that a try if you are looking for a healthy variation.

Saturday, January 15, 2011

Christmas gift

Guess what I got for Christmas?
a dehydrator
It is very cool!
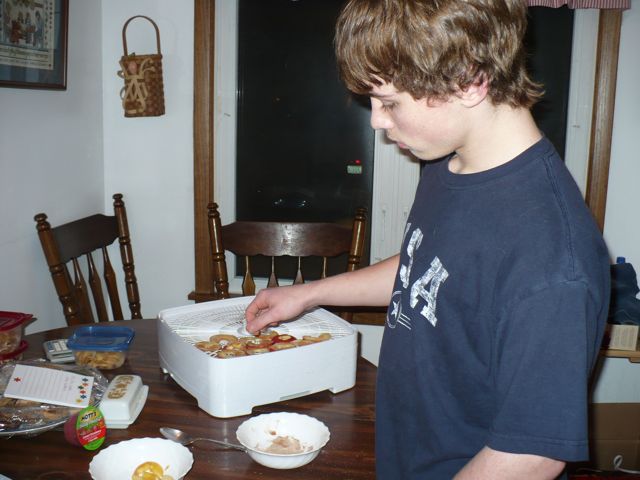
I tried bananas and they weren't our favorite - but then I tried the apples. Wow - fabulous! I did one batch the other day and they are almost gone! They were very good and everyone loved them. Here my son is helping. Below you can see them all laid out. My husband got me a square shaped dehydrator and apparently they are better than the round ones - more space to lay out the food. Things fit better.
When I did the first batch of apples, I tried two different ways. One way (clearly the healthier way) - I cut them up and soaked them in lemon water for a bit as I cut up the rest. They were good. Turned out really nice. The other way, I cut them up and sprinkled them with cinnamon and sugar. They turned out fabulous. While I don't always like to encourage adding extra sugar - these I feel are better than eating a candy bar and taste so much better than candy. The kids loved them so much they asked me to make another batch. One of the best things is the smell - the whole house smells like apples and cinnamon! What a wonderfully delicious smell!

This is what they looked like - this is the healthier batch.
The kids ate up the cinnamon and sugar batch - so until the second batch is done - I don't have anything to take a picture of. Just goes to show how good they are - they are gone before the picture could be snapped!

Monday, December 20, 2010

Impossibly Easy Taco Pie


This is a recipe that I got from the Betty Crocker website - and it was so easy - and tasted fabulous. I didn't have any green chiles - so I used mild jalapenos - cut up. It was nice and mild - which we loved. I topped it with fresh cut up tomatoes, salsa and sour cream. I would think black olives on top would be good, too!

1pound lean ground beef
1medium onion, chopped (1/2 cup)
1package (1 ounce) Old El Paso® taco seasoning mix
1can (4.5 ounces) Old El Paso® chopped green chiles, drained
1cup milk
2eggs
1/2cup Original Bisquick mix
3/4cup shredded Monterey Jack or Cheddar cheese (3 ounces)
Old El Paso® salsa (any variety)
Sour cream, if desired

  1. Heat oven to 400°F. Grease 9-inch pie plate. Cook ground beef and onion in 10-inch skillet over medium heat, stirring occasionally, until beef is brown; drain. Stir in seasoning mix (dry). Spoon into pie plate; top with chilies.
  2. Stir milk, eggs and Bisquick mix until blended. Pour into pie plate.
  3. Bake about 25 minutes or until knife inserted in center comes out clean. Sprinkle with cheese. Bake 8 to 10 minutes longer. Cool 5 minutes. Serve with salsa and sour cream.

Thursday, December 9, 2010

Pork Sausage Apple Loaf


I made this tonight - it was really good.

It is from Betty Crocker - and you can find the recipe by clicking here.

Friday, December 3, 2010

excellent recipe - potatoes

A friend from church told me his wife makes this for him and he loves it. I decided to give it a try and it was truly wonderful tasting. (Sorry no picture - I completely forgot to get the camera out!) Trust me though - these are really good.

And so simple ---


Take some potatoes.

Now my friend said to peel them first but I think the skins are good - plus lots of vitamins in the skins. So I kept the skins on. Washed the potatoes and then cut them into wedges.

Put some olive oil in a bowl.

Also take some cornflakes - I took a glass and rolled it over the cornflakes so that it crushed them up.

Dunk / roll the potatoes in the olive oil.

And then roll them in the cornflakes.

Put on a cookie sheet covered with aluminum foil.

Bake for about 45 to 50 minutes at 375. My friend just said cook it until it seems done. I choose 375 and they were done in about 50 minutes. Basically, they should be crispy on the outside and soft on the inside.

They were very, very good. My husband and oldest son were 'fighting' over them. My two youngest didn't eat them - but they are not a good judge of things - they are my picky eaters. If we all ate what they liked we would all have to live on peanut butter and jelly.

Friday, November 12, 2010

Fun book for Thanksgiving


Book Cover

I Know an Old Lady Who Swallowed a Pie by Alison Jackson

What a fun book! My 7 year old and I read the book and then we made Pumpkin Pie Bites (basically bite size pies --- so they could swallow a pie too!)

Don't they look delicious!


This was such a fun book and a fun activity --- but (don't laugh) the child I did this with is actually allergic to dairy. So he couldn't eat the pumpkin bites. I made the pie crust from scratch instead (the recipe called for refrigerator ready to roll pies). Since I made it myself I knew there was no dairy in the crust - so I made extra. Then I let JJ roll it out, cut it into strips. He put cinnamon and sugar on them --- and baked. Mmmmmm Mmmmm good! That was JJ's treat and he was very happy with it.
Putting the cinnamon and sugar on is quite the process and totally fun when you are 7!
Recipe for Pumpkin Pie Bites

I made my own pie crust dough.

8 oz. cream cheese, room temp.
1/2 sugar
1 cup canned pumpkin
3 eggs
1 teaspoon vanilla
1 teaspoon pumpkin pie spice

Preheat oven to 350 degrees
Use a cookie cutter to cut out 24 round shapes from each pie crust. Make sure the dough is rolled very thin.

Press dough into mini muffin tray. It is recommended that you use a 24 cup mini muffin tray - make 12 at a time, alternating cups to make sure pie crusts don't overlap each other. I only had a 12 cup mini muffin tray and just decided to go for it. I made all 12 at once.

Apply egg whites from one egg to the top edge of each pie.

Mix cream cheese, sugar, canned pumpkin, remaining 2 eggs, vanilla and pumpkin pie spice together until thoroughly combined.

Spoon mixture into each pumpkin-shaped pie crust.

Bake for 12 to 15 minutes --- I don't know what was up on this --- but mine took closer to 30 minutes each.

Remove pies to cool and repeat. Place muffin tray in the freezer to cool it quickly for re-use. (I didn't do this. I actually washed and dried the tray - then re-used. Maybe a bit of anal-retentiveness there but hey!)

This is the site I got the recipe from - click here

One of the best things about making fun treats is sharing!
JJ is all set - he took some of the wonderful treats plus Whipped Cream to our dear, sweet, wonderful neighbor. We hope they enjoyed them.

Saturday, October 23, 2010

Chicken A LA King - recipe from Taste of Home's Slower Cooker Favorites


This turned out to be a very good dinner - but the best part is it - how easy it is - it is a slower cooker meal. Throw it in and dinner is ready when you get home! Very cool and very needed for those busy on the run days - of which I have had way too many lately.

1 can condensed cream of chicken soup, undiluted
3 tablespoons all-purpose flour
1/4 teaspoon pepper
Dash cayenne pepper
1 pound boneless skinless chicken breasts, cut into cubes
1 celery rib, chopped (I used 3)
1/2 cup chopped green pepper (I used 1 cup)
1/4 cup chopped onion (I used 1/2 cup)
1 package (10 oz) frozen peas, thawed
2 tablespoons diced pimientos, drained

And hot cooked rice (I used a brown rice)

In a slow cooker, combine soup, flour, pepper and cayenne until smooth.

Stir in chicken, celery, green pepper and onion. Cover and cook on low for 7-8 hours or until meat juices run clear.

Stir in peas and pimientos. Cook 30 minutes longer or until heated through. Serve over rice